The virtual classroom is an instructional software that can be used to hold virtual classes online. Teachers and students can login to the classroom, pick the course they are attending, see who is available, send each other messages, and exchange web pages. This is a versatile tool that has developed over the years to become a mature product that features a useful and easy to use graphical interface. The tool is organized in a client-server architecture in which clients (student and teacher classroom tools) connect to the virtual classroom server which validates and coordinates the communication between the different clients connected to it at a given time. Moreover, the server itself is structurally divided into two modules: the Name Server and the Virtual Communication Server (VC Server). The Name Server is the part that is responsible for authenticating clients when they first login to the classroom using an Access database for students and courses, and then the actual communication between clients is delegated to the VC Server which from this point on takes control of managing clients.
The Virtual Classroom is structured into two main components: client side components and server side components. A description of those components follows.
Student Tool:
The main unit in this component is in the file called Unit_Main.pas and this unit is responsible for the following operations:
* Drawing the different GUI components such as buttons, icons, drop-down lists, panels, etc.
* Minimizing and maximizing the main form of the tool
* Drawing the emoticons of the students and the teacher in the classroom window and all the operations associated with those images
* Action_SendExecute: this method is responsible for sending the chat messages to either all participants in the classroom meeting or to a private person
* connectNS: this method connects the student tool to the name server
* SaveExecute: this method saves the dialogue messages exchanged during the classroom session if the user chooses to do that
* connectVC: connects the student tool to the server side (VCServer and ImageServer)
* DrawBlink: draws a blinking image using the method BlinkImage when an image is changed by the user or the system
* SilentDownloadAll: downloads all the new images from the server after connection and backs up the old images and removes them
* UploadImage: allows the user to upload new images for use instead of the emoticons
* Timer2Timer: this is the heart of the student tool as it is the central routine that selects an action from a set of commands as follows:
o login: if the command is to login, the student name and password are checked and the login operations are performed
o url: perform operations to send a page using the web browser
o msg, msgPrivate or msgTeacher: send a chat message to all, a private person, or the teacher
o updateImage: update the image of the person according to his or her choice
o push permission: give push permission to students
o image permission manage: set permissions for image manipulation
o indicate whether teacher is online by drawing his icon to indicate so
o update online student list
o meeting: set the session to meeting
Teacher Tool: The teacher tool is also on the client side of the system and is very similar to the student tool except that the teacher is allowed to do management tasks that students are not allowed to do such as setting the push permissions and the image management permissions, etc. Also the teacher tool has a drawing area that can be used to draw shapes and send them to other clients, but unfortunately the student tool currently does not support this feature.
SmartUpdate: This component is responsible for updating the software both for the student and teacher tool. Its main module is in Unit_Main.ps. it checks for any new updates available at the server and if so it downloads them and accordingly updates the client tools.
VCServer:
The heart of this component is in MainForm.pas and it is responsible for the following actions:
* Drawing the different user interface components
* Creating and adding clients to the list of active clients when new connections arrive. This is done through the procedure called tcpServerConnect
* Destroying and removing clients from the list when clients log off. This is done through the mirror procedure tcpServerDisconnect
* tcpServerExecute: this procedure is the heart of the server and it switches its actions according to the status of the client:
o cslogin: if the client is logging in, it verifies the client login information and accepts or denies the login. If the client is accepted, it is added to the tree of clients and is given a list of courses to pick from
o cstalking: if the client is in the talking status, different operations are expected here such as sending in private or broadcast, etc.
* BroadcastMessage: this procedure is responsible for sending a message to all clients
NameServer:
This component is responsible for handling issues related to databases of usernames, server DNS name, students and teachers, etc. All tools that need authentication such as the VC Server starter program and the student and teacher tools need to connect to this component first to get authenticated before they can communicate with each other through the VC Server. Its main modules are:
* Unit_db.pas: this module is responsible for communicating with the database that has all the information about students, teachers, courses, etc. It has a number of queries that request usernames, passwords, list of courses registered for/taught, list of students in classroom, etc.
* Unit_Main.pas: this part is responsible for drawing the UI and its different components
Root directory:
The root directory contains codes that are common for all the different components of the virtual classroom such as the following:
* Unit_Common.pas: this contains the variables, constants and definitions shared by all components such as the communication protocol message types. It also contains some procedures and structures that are global to all other modules such as Delay, GetIPAddress, etc.
* FmxUtils.pas: this module is responsible for file operations such as copying, moving and executing files
* Unit_DrawingTool.pas: this is responsible for drawing and all its associated operations
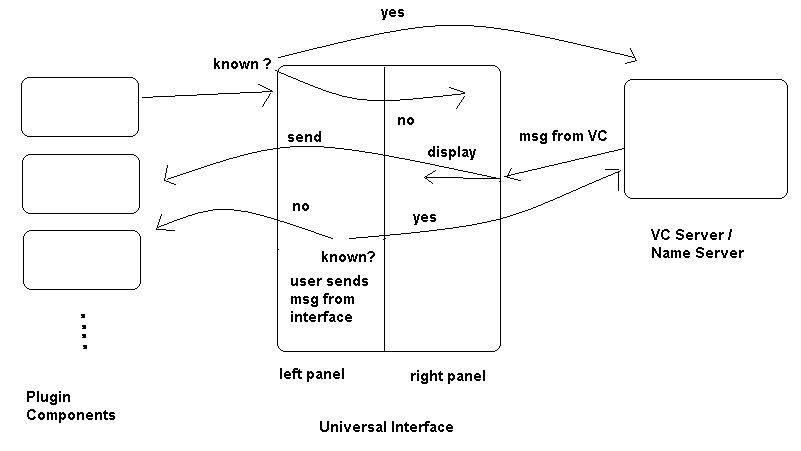
The diagram below shows how the universal interface works by posing in the middle between the VC/Name Server and the plug-in components being tested to deliver messages back and forth depending on the type and source of a given message. Some of the messages are forwarded and displayed on the right panel of the universal interface so that the user can see what kind of data was sent. This is especially needed during the login process since after the client is authenticated by the Name Server, a list of courses is sent to that client to pick a course to join and therefore that message is displayed on the right panel of the universal interface.
A number of messages are handled in the current implementation. These can be found at this URL: http://www.cs.pitt.edu/~chang/163/interface/Message.htm. Those messages are of two categories: messages that are sent to the VC Server by other components which include messages with the following IDs: 0, 3, 5, 7, 8, 9, and messages that are received from the VC Server and those include the rest of the messages (1, 2, 4, 6, and 10). The new messages for the Slow Intelligence System can be found at this URL: http://www.cs.pitt.edu/~chang/163/interface/MessageSIS.htm. More messages may be added later.
InterfaceServer.java:
This module is the background server that the GUI program prjRemote.exe connects to. The user types or loads the XML files into the GUI which in turn forwards those messages to InterfaceServer module. This module is responsible for parsing the data, encoding it, and then forwarding it to the VC Server. It also indirectly receives messages from the VC Server through the componentMy module and forwards them to the plug-in component. This module is multithreaded with one thread responsible for communicating with the GUI program and the other threads are responsible for communicating with each individual component (one thread per actively communicating plug-in component).
componentMy.java:
This is the main module which is responsible for most of the actual work needed to encode and decode messages sent and received from the VC Server. It is organized into a number of methods each of which is responsible for processing a specific kind of message. Different methods are needed for each message to be compatible with the VC Server specification of messages. An additional method called processMsg is responsible for switching and directing messages by their msgID. To receive messages from the VC Server, another thread is needed. This thread is created after the connection is established with the VC Server and it is responsible for receiving messages from the VC Server and handling them according to their message ID value which can be either one of the messages found in http://www.cs.pitt.edu/~chang/163/interface/Message.htm, in which case it is forwarded to the corresponding component, or a new message type which is then displayed on the right panel of the universal remote GUI.
If it is desired to forward all messages
received from the VC server to the PluginComponent, a
modified componentMy.java
can be used instead. The two versions have some
minor differences.
PluginComponent.java:
This is a simple module to test the plug-in component communication with the VC Server through the universal interface. It take messages from the standard input in a key-value list and sends them to the universal interface which in turn either forwards them
to the VC Server if the message ID is known or displays them on the right panel of the GUI if the ID is unknown.
First start the classroom software as follows: the Name Server is started first and then the VC Server after that. Starting the VC Server requires an administrator account. A test account is available with mohammed as the first name and mohammed as the last name and 1234 as the password.
Then to see the effects of operations done by the universal interface, you should start a number of student and teacher clients: one teacher and one or two students can be enough. You can use this information for the teacher: first name sk, last name chang and password is 1234. For the student tools you can use test1 for first and last name and 1234 for the password. Six accounts are available for students starting from test1 until test6.
Then to test the forwarding of messages and its compliance with the specifications, you should start the plug-in component from the command line by running: java PluginComponent [UniversalInterface_IP]. This component has two threads one responsible for receiving messages from the universal interface and one for processing user input and sending messages to the universal interface. The user can input a message that he wishes to send according to this specification which is also followed in the VC Server: the user types in a list of key value pairs starting with the msgID and according to the specification in http://www.cs.pitt.edu/~chang/163/interface/Message.htm, the delimiter $$$ should be used between all key value pairs and between key and value also.
Then start the universal interface server from the command line by running this command from the directory where the interface server is: java InterfaceServer [VC_IP]. After that run the GUI program prjRemote.exe, and connect to the server. Now you should be ready to begin connecting to the VC Server and exchanging messages. Load the XML file with msgID of zero to send a login message to the server and right after that you should receive a message on the right panel telling you the available courses at this moment, now pick the XML file for course selection and enter the right course number in the appropriate place on the left panel and send your course selection. Now you are ready to exchange the rest of the other messages available for use by loading the appropriate XML file. Note that before sending any of the other messages, the login followed by the course selection messages should be done first. This is a requirement by the way the VC Server and Name Server are designed.